

IP Traffic by Application/Location/Process (Trend View)
The trend view IP traffic graph gives you an overview of periodical trends. The graph comes in three different variants:
- IP traffic by application
- IP traffic by location
- IP traffic by process
To view the IP traffic trend graphs, select ANALYZE > Graphs > Trend View and then either IP Traffic by application, IP Traffic by location or IP Traffic by process.
Generate and view the graph
Section titled “Generate and view the graph”Set up the graph on the Setup tab, and then click Update. The graph opens on the Graph tab.
-
Servers: Select the server or server group that you want to base the graph on. Server groups are enclosed in <>. Only server groups and monitored servers are listed, see Server Lists for details about monitored servers. On the IP Traffic by application graph, you can select multiple servers and server groups by pressing the CTRL key while selecting servers.
-
Agents: Select the group of computers that you want to base the graph on. Super groups, that is groups of groups, are enclosed in <>.
-
Processes: Select which processes you want to base the graph on. You can select multiple processes by pressing the CTRL key while selecting processes. IP data process information is not collected on computers that run Windows XP.
Sometimes the list contains a process called No process name found or UNKNOWN. This happens when a process starts and ends within a very short time frame: PerformanceGuard registers the process, but doesn’t have time to collect its name.
-
Ports: Select which port or port group you want to base the graph on. Port groups are enclosed in <>. Only port groups and monitored ports are listed, see Port Lists for details about monitored ports.
-
Type: Determines which type of data the graph will contain. The options are described in Graph Terms and Definitions.
-
Y-axis Min and Max: Specify the range that you require for the graph’s vertical axis. If you leave the fields empty, the range will automatically reflect the minimum and maximum values found in the data.
-
Trend Period: Select how much time each data point on the graph covers. For example, if you select Day, the graph will display one data point per day. The available periods depend on the PerformanceGuard configuration (ADMINISTRATION > Reporting > Periods).
An hour-based trend period is particularly useful when you view data from up to one week. A day-based trend period is useful when you view data from up to one month. A week-based trend period is useful when you view data from more than one month. A month-based trend period is useful when you view data from more than six months.
-
Interval: Select the period of time that the graph should cover. If the predefined intervals don’t suit you, select Custom to Custom Time Periods on Graphs.
-
Disconnect samples: By default, the samples in the graph are connected by a line. Select this check box to show the samples as separate points.

Connected samples

Disconnected samples
-
Fitted line: Include a fitted regression line (that is the best-fitting straight line through the graph’s points).
-
split: This button is only visible on the Setup tab (next to the Update button) when you have selected one or more server groups and then generated the graph. When that’s the case, you can return to the Setup tab and use the split button to split the selected server groups into individual servers.
Thresholds
Section titled “Thresholds”For the data types Response time (ms) and Retransmissions (%), a threshold—that is a baseline that the displayed values must ideally be below—can be displayed as a horizontal line in the graph when:
- Your PerformanceGuard administrator has defined such thresholds
- You have selected one server group and one agent group (if you have selected multiple groups, threshold display is not available, because thresholds can be different across groups)
You may sometimes see more than one threshold on a graph. This is because your PerformanceGuard administrator is able to set up multiple thresholds for the same type of data. This can be useful in order to indicate different severities, for example if values above 80 are acceptable for short periods of time, whereas values above 90 require immediate attention.
On the graph each threshold has a name, so it is easy for you to see what the threshold is about.
Display of thresholds is by default on. On the Graph tab, you can toggle threshold display off by clicking Hide thresholds (and on again with Show thresholds). This can be useful, for example if you think that a threshold blocks your view of the graph’s data points.
If a graph has thresholds, the thresholds will also appear if you use the graph in a report, except when they’re hidden. Displayed thresholds are always the currently valid ones.
Statistics table
Section titled “Statistics table”When you view the graph, you’ll also see a Statistics table below the graph. Note that the Statistics table shows the weighted average for the graph’s samples. That means that each value to be averaged is assigned a weight based on the number of occurrences of that value.
What’s a connection reset, and how can it be higher than 100%?
Section titled “What’s a connection reset, and how can it be higher than 100%?”A connection reset is typically the sign of a busy server that puts clients “on hold” until it’s ready to serve them. It does this by forcing clients to connect again. This buys the server time, so that it is able to get rid of its current queue of tasks before taking on new tasks. From the server’s perspective the advantage of this is that it can keep the queue of clients waiting on the network rather than on the server itself.
The amount of time that a connection reset takes is very small, so it typically takes several connection resets before users begin to feel that the server is hard to reach. Once the server has accepted the connection, it will normally respond quickly. That’s why connection resets mainly affect users’ ability to get in touch with the server in the first place, not their subsequent use of the server.
Technically, PerformanceGuard records a connection reset when it receives a data packet with the RST bit set to 1. If a client attempts to connect to a server, and the server responds with a connection reset, and the server then accepts the client’s next connection, PerformanceGuard will record a connection reset percentage of 100. A busy server that keeps several client connections “on hold” will lead to connection resets above 100%.
In our experience, it typically takes connection resets of 250% or above before users begin to notice. On very busy servers, we’ve momentarily seen 10,000% connection resets.
If a high connection reset percentage is a problem, you need to look at the performance of the server: Is the server’s CPU heavily loaded? Does the server have enough RAM? Is there a disk I/O bottleneck? If you’re monitoring the server with PerformanceGuard, you can easily find out, for example by looking at the server’s Computer Utilization Index.
Special note about the IP Traffic by process graph
Section titled “Special note about the IP Traffic by process graph”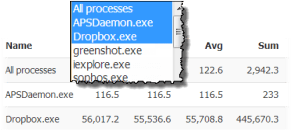
When you use the IP Traffic by process graph, you should know the following:
You are able to base your graph on All processes and/or one or more individual processes. If you select All processes, the graph will show an average value for all of the processes that you are able to select. That average value can sometimes be very different from the value of an individual process.
Is performance good or bad?
That depends on the type of work that you do in your organization, but you can often follow our I Want to Know if Performance Is Good or Bad.