

SSL Server Certificate for HTTPS
Enable HTTPS during installation (8.2 or newer)
Section titled “Enable HTTPS during installation (8.2 or newer)”When you enable SSL encryption for the web interface, make sure that the clients that connect trust the certificate. If you use the ServiceNow integration, the certificate must be issued by a publicly trusted certificate authority.
You’ll need a file that contains your server certificate, any intermediate certificates and the private key. Often, the private key isn’t part of the file delivered by your certificate authority. Instead, you may receive a file in the PKCS#7/P7B format. You must then yourself export the private key and certificates into a keystore in a format like PKCS#12/PFX, PEM or DER.
The following is an example of importing a PKCS12 keystore into PerformanceGuard. The PKCS#12 or PFX format is a binary format for storing the server certificate, any intermediate certificates and the private key in one encryptable file. PFX files usually have extensions such as .pfx and .p12. PFX files are typically used on Windows computers to import and export certificates and private keys. PFX files are password-protected, and you need the password to install the certificate file.
During installation, select Use SSL in the Backend Properties step. The installer then changes the display ports to the default SSL ports: 443 for Primary Display Port and 8443 for Secondary Display Port.
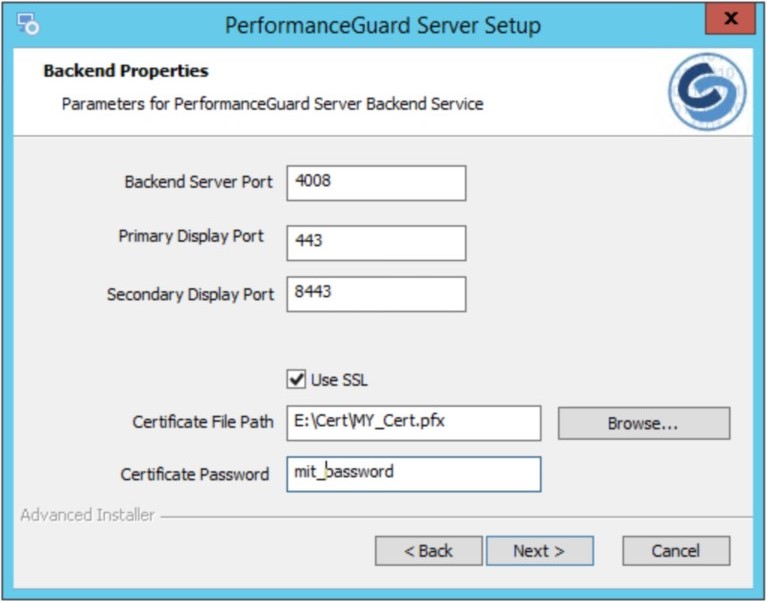
Browse to choose your certificate in Certificate File Path, and enter the Certificate Password. The installer configures both web server services for HTTPS.
Manual settings for SSL configuration
Section titled “Manual settings for SSL configuration”Use these steps if you want to turn HTTPS on or change the certificate after the installation. The settings are stored in a configuration file in the root of your PerformanceGuard server installation, see Server Settings Ini.
- Configuration File : “Installation Path”\Settings.ini
Settings to look for:
- MERLINPORT : Primary Display Port number. (Default 443)
- PGUARDPORT : Secondary Display Port number. (Default 8443)
- SSL_KEY_STORE_PATH : Full path to your Certificate.
- SSL_KEY_STORE_PASSWORD : The password for your certificate, as saved by the installer. (Can’t be empty)
- PGUARDSECURE : true/false (Default true)
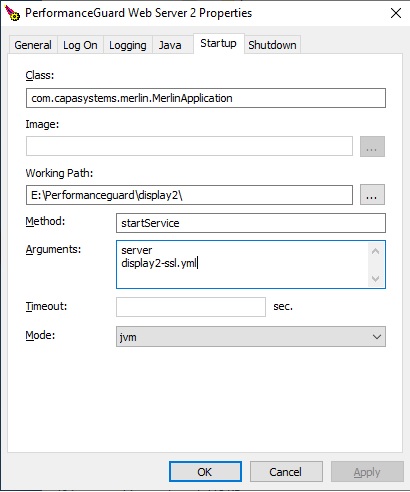
Change the startup argument of the Web Server 2 service:
- Stop Display services (pgdisplay and pgdisplay2)
- Launch “Installation Path”\display2\pgdisplay2w.exe
- Goto Startup
- Change Argument display2.yml to display2-ssl.yml
- Apply and start Display services (pgdisplay and pgdisplay2)
Previous versions of the installer
Section titled “Previous versions of the installer”If you configure the PerformanceGuard web interface to use HTTPS connections, the web interface is by default installed with a self-signed server certificate. Communication between web browsers and the web interface will be encrypted with SSL, but browsers will complain that the certificate isn’t trusted. To resolve this security issue, you must install your own server certificate that’s signed by a trusted authority (such as VeriSign or Symantec).
You’ll need a file that contains your server certificate, any intermediate certificates and the private key. Often, the private key isn’t part of the file delivered by your certificate authority. Instead, you may receive a file in the PKCS#7/P7B format. You must then yourself export the private key and certificates into a keystore in a format like PKCS#12/PFX, PEM or DER.
The following is an example of importing a PKCS12 keystore into PerformanceGuard. The PKCS#12 or PFX format is a binary format for storing the server certificate, any intermediate certificates and the private key in one encryptable file. PFX files usually have extensions such as .pfx and .p12. PFX files are typically used on Windows computers to import and export certificates and private keys. PFX files are password-protected, and you need the password to install the certificate file.
During installation check the Use SSL checkbox.
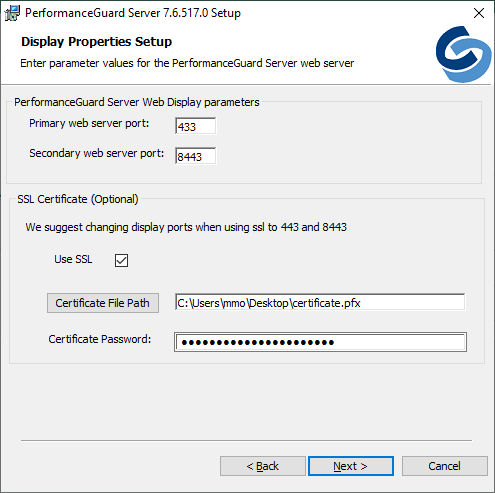
- Primary Web Server Port: Change Value to a port of your choosing e.g. 443
- Secondary Web Server Port: Change Value to a port of your choosing e.g. 8443
- Use SSL: Check the box
- Certificate File Path: Select the path to the certificate file on local machine
- Certificate Password: Password of the certificate file
Manual SSL server certificate installation (before 7.6)
Section titled “Manual SSL server certificate installation (before 7.6)”If you configure the PerformanceGuard web interface to use HTTPS connections, the web interface is by default installed with a self-signed server certificate. Communication between web servers and the web interface will be encrypted with SSL, but browsers will complain that the certificate isn’t trusted. To resolve this security issue, you must install your own server certificate that’s signed by a trusted authority (such as VeriSign or Symantec).
You’ll need a file that contains your server certificate, any intermediate certificates and the private key. Often, the private key isn’t part of the file delivered by your certificate authority. Instead, you may receive a file in the PKCS#7/P7B format. You must then yourself export the private key and certificates into a keystore in a format like PKCS#12/PFX, PEM or DER.
The following is an example of importing a PKCS12 keystore into PerformanceGuard. The PKCS#12 or PFX format is a binary format for storing the server certificate, any intermediate certificates and the private key in one encryptable file. PFX files usually have extensions such as .pfx and .p12. PFX files are typically used on Windows computers to import and export certificates and private keys. PFX files are password-protected, and you need the password to install the certificate file.
-
Add the my_certificate.pfx to display folder of \[PerformanceGuard installation folder]\display:
-
Edit \[PerformanceGuard installation folder]\display\conf\performanceguard.xml and change the values of the following parameters:
- port: Change Value to a port of your choosing e.g. 8443
- secure: Change value to true
- keyStorePath: Configure path to keyStorePath i.e. <Parameter name=“keyStorePath” override=“false” value=“mykeystore.p12”/>
- keyStorePassword: Add password to keyStorePassword i.e. <Parameter name=“keyStorePassword” override=“false” value=“$m3llycat”/>
-
Add a keystore mykeystore.p12 to display2 folder of \[PerformanceGuard installation folder]\display2.
-
Open \PerformanceGuard installation folder\display2\display2.yml and overwrite the # Server Settings section with the following:
Terminal window # Server Settingsserver:rootPath: '/api/*'applicationContextPath: /applicationConnectors:- type: httpsport: 443maxRequestHeaderSize: 64KiBmaxResponseHeaderSize: 64KiBkeyStorePath: 'mykeystore.p12'keyStorePassword: '$m3llycat'validateCerts: falseThen move down to the # Old Display Settings section and change the value of the following parameter:
- hostPort: Change to the port that you set in step 2 (e.g. 8443)
- hostSecure: Change value to true
Terminal window # Old Display Settingsclassic:hostPort: '8443'hostSecure: 'true'
-
Open \PerformanceGuard installation folder\notification\conf\config.properties and change the following parameters:
Terminal window displaySsl=truedisplayPort=8443 (or which ever port you have used above) -
Save the files that you have edited and then restart the PerformanceGuard Web Server and PerformanceGuard Web Server 2 services.