
Move Database
PerformanceGuard supports the following relational database management systems:
- SQL Server 2012 (CPU license) from PerformanceGuard version 6.1.16
- SQL Server 2014 from PerformanceGuard version 6.5.100
- SQL Server 2016 from PerformanceGuard version 7.0
- SQL Server 2017 from PerformanceGuard version 7.4
- SQL Server 2019 RC1 have been tested with PerformanceGuard version 7.5 but no official release was available from Microsoft at the time of the release of PerformanceGuard 7.5
Back Up Existing Database
Section titled “Back Up Existing Database”Follow the procedure in Back Up Database and then return to this topic.
Restore Database on New SQL Server Instance
Section titled “Restore Database on New SQL Server Instance”- Stop all PerformanceGuard services.
- Open Microsoft SQL Server Management Studio and connect to the required database server as sa user (that is with system administrator rights).
- In Microsoft SQL Server Management Studio’s Object Explorer, locate the pguard database.
- Right-click pguard and select Tasks > Restore > Database.
- Microsoft SQL Server Management Studio will typically remember your backed-up version of the PerformanceGuard database. When that’s the case, select pguard in the From database menu.

If you can’t select pguard this way, select From device and click the browse button next to the field. Then click the Add button and locate your pguard.bak backup file at the location that you noted down when you backed up the database. When ready, click OK twice to return to the Restore Database dialog. - Select the Restore Database dialog’s Options page. For every database file in the list, change the path to the required new location.
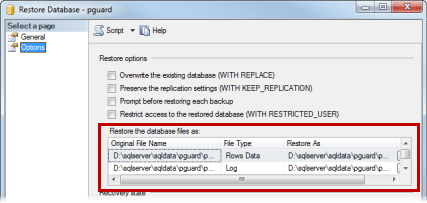
-
Microsoft SQL Server Management Studio is now ready to restore your database at the new location, and leave it ready to use by rolling back any uncommitted transactions. If you want to further adjust any restore and recovery options, do this while you work on the Options page.
When ready, click Next.
The database will now be restored, and you’ll be able to view the progress. When the restoration is finished, you’ll see a confirmation message.
-
In Microsoft SQL Server Management Studio, right-click the pguard database and select Properties to verify that the restored database matches your expectations, especially with regards to file size limits.
When satisfied, click OK.
-
In Microsoft SQL Server Management Studio’s toolbar, click New Query.

-
Enter the following in the new query window. Remember to replace ‘password’ with the actual required password for your database.
When ready, click the **Execute** button.
11. Start all PerformanceGuard services again.
Change Database Connection Information
Section titled “Change Database Connection Information”When the database has been moved, you must change the configuration of the PerformanceGuard services so that it reflects the new location of the database.
If You Moved the Backend Server Database
Section titled “If You Moved the Backend Server Database”Change the configuration in setting.ini:
-
Open [PerformanceGuard installation folder]\settings.ini
-
Change the following entries:
- BE_DB_HOST= “New SQL server”
- BE_JDBC_CONNECTSTRING=jdbc:sqlserver://“New SQL server”;databaseName=pguard;
-
-
Save Settings file
If You Moved the Frontend Server Database
Section titled “If You Moved the Frontend Server Database”Change the configuration in setting.ini:
-
Open [PerformanceGuard installation folder]\settings.ini
-
Change the following entries:
- FE_DB_HOST= “New SQL server”
- FE_JDBC_CONNECTSTRING=jdbc:sqlserver://“New SQL server”;databaseName=pguardfe;
-
-
Save Settings file
After Saving Settings.ini with the new configuration. Start all services, and check logs for connections success