

What are Dashboards?
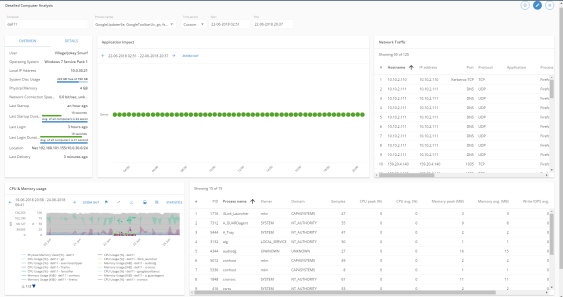 PerformanceGuard dashboards let you continuously monitor key metrics, organized and presented in the way that’s relevant to you. You can have multiple dashboards for different purposes and switch between them.
Dashboard basics
Section titled “Dashboard basics”Use the menus at the top of each dashboard to control what the dashboard displays, for example which Computers you want to view information about, and which Time period the dashboard’s graphs and timelines should cover.
The layout of a dashboard is determined by the user who created it, or by a PerformanceGuard administrator. If you can’t edit a dashboard, you can’t change its layout. However, the dashboard may still let you change individual widgets, because each widget parameter has one of these settings:
- Inherit: The typical setting. The widget uses the settings that you specify at the top of the dashboard. If all widgets on a dashboard use this setting, the entire dashboard reflects the settings that you specify at the top of the dashboard.
- User may change: You can change the parameter on the widget itself, independently of what you have specified at the top of the dashboard. When that’s the case, the widget has this icon that you can click to change it:

- Fixed: You can’t change the parameter, not even if you specify something else at the top of the dashboard. This setting is primarily relevant for widgets that contain reference information. It can explain why a widget doesn’t respond to the settings you select at the top of the dashboard.
Find a dashboard
Section titled “Find a dashboard”Select Dashboards in the sidebar to see all dashboards that you have access to:
- Public dashboards are visible to all users. They’re marked with a globe icon
 .
. - Private dashboards are only visible to the user who created them. PerformanceGuard administrators can see all dashboards.
- A lock icon means that you can’t edit the dashboard. Place the pointer over the icon to see who created it.
Use these options at the top of the page to find the right dashboard:
- Search: search dashboard titles.
- Created By: show dashboards created by anyone (All), by you (Me), or by a specific user.
- Show Tags: show only dashboards with the selected tags. See Dashboard Tags (Categories).
- Sort By: sort by Title A-Z, Last Viewed or Last Updated.
- The grid/list button switches between thumbnails and a list.
The Home page shows your favorites and the dashboards that you viewed most recently. See Favorites / Latest.
Create a new dashboard
Section titled “Create a new dashboard”All PerformanceGuard users can create dashboards.
- Select Dashboards in the sidebar, and then click Create dashboard.
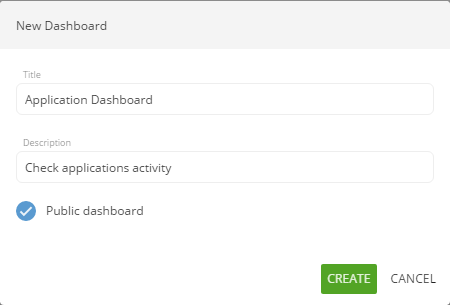
- Enter a Title and, optionally, a Description. The title must be unique.
- To let all users see the dashboard, select Public dashboard.
- Click Create. The dashboard opens in edit mode, and the widget catalog opens.
- Click Add on the widgets that you want. You can also add a ready-made set of widgets from the Templates tab. See Widget Templates.
- Arrange and set up the widgets, and then click Save dashboard.
The widget catalog only shows the widgets that your user role gives you access to.
Use a computer, not a mobile device, when you create or edit a dashboard. You can’t design the dashboard layout properly in mobile view.
Edit or copy an existing dashboard
Section titled “Edit or copy an existing dashboard”You can edit the dashboards that you created. PerformanceGuard administrators can edit all dashboards, except built-in ones.
- Edit: open the dashboard and click the edit button in the dashboard toolbar. You can also click the menu
 next to the dashboard on the Dashboards page and select Edit.
 - Copy: click the menu next to the dashboard on the Dashboards page and select Copy Dashboard. You can also open the dashboard, click the menu button in the dashboard toolbar, and select Copy. The copy is yours, so you can edit it.
In edit mode, you can change the title, description, tags and Public dashboard setting in the toolbar. Click Preview dashboard to see the dashboard with data, and Save dashboard to save your changes.
Share a dashboard
Section titled “Share a dashboard”You can email a link to the dashboard to other people.
- Open the dashboard and make the selections that you want the recipients to see.
- Click the menu button in the dashboard toolbar, select Sharing, and then select Share with recipients.
- In Recipients, enter the recipients’ email addresses. Separate multiple addresses with semicolons (;).
- Optionally, enter a Note (optional). It becomes part of the email message.
- Click Share.
The recipients receive an email with a link to the dashboard. The link opens the dashboard with the selections, including the time period, that you had when you shared it. Recipients need a PerformanceGuard user account to open the link. To give people without an account access to a dashboard, use Guest Access.
Sharing requires that SMTP is set up. See Manage SMTP Notification Service.
To save the dashboard as a PDF file, or to have PDF files created and emailed on a schedule, see Dashboard Reports.
Multi-editor environments
Section titled “Multi-editor environments”PerformanceGuard doesn’t lock a dashboard while someone edits it. If two users edit the same dashboard at the same time, the changes that are saved last are the ones that are kept.
Dashboard history
Section titled “Dashboard history”Every time a dashboard is saved, PerformanceGuard keeps the previous version as a revision. If you can edit the dashboard, you can view its history:
- Open the dashboard, click the menu button in the dashboard toolbar, and then select History.
- The list shows each revision with its date and who created it. Click Preview dashboard to view a revision.
- Click Restore to restore the revision. PerformanceGuard saves the restored revision as a new revision.
You can’t preview or restore the latest revision, because that’s the version that the dashboard shows now.
Auto-update dashboards
Section titled “Auto-update dashboards”Auto-update  refreshes the dashboard automatically, so you always see the latest data. Click the auto-update button in the dashboard toolbar to:
- Refresh dashboard: update the dashboard now.
- Auto-update dashboard: turn auto-update on or off. When auto-update is on, the button shows the update interval in minutes and a progress ring, and the menu shows when the next update happens.
PerformanceGuard sets the update interval automatically, based on the dashboard’s time period:
| Time period | Update interval |
|---|---|
| Up to 4 hours | Every minute |
| Up to 24 hours, or the current day | Every 3 minutes |
| Up to 3 days | Every 5 minutes |
| Longer than 3 days, the current week, or the current month | Every 15 minutes |
| The previous day, week or month, or a custom period | Auto-update is off by default |