

PXE Boot and Provisioning Issues
Use this page when a device doesn’t boot into the CapaOne provisioning environment over the network, or when provisioning stops before Windows is installed. Start with Check the network requirements, then find the section that matches what you see on the device.
How PXE boot reaches the provision point
Section titled “How PXE boot reaches the provision point”When a device PXE-boots on the same subnet as the provision point, this happens:
- The device broadcasts a PXE request on its subnet.
- The DHCP server offers the device an IP address.
- The provision point — the managed endpoint that runs the CapaOne PXE server — tells the device where to get the boot file.
- The device downloads the boot file from the provision point.
- The CapaOne provisioning environment starts, connects to CapaOne, and shows a QR code.
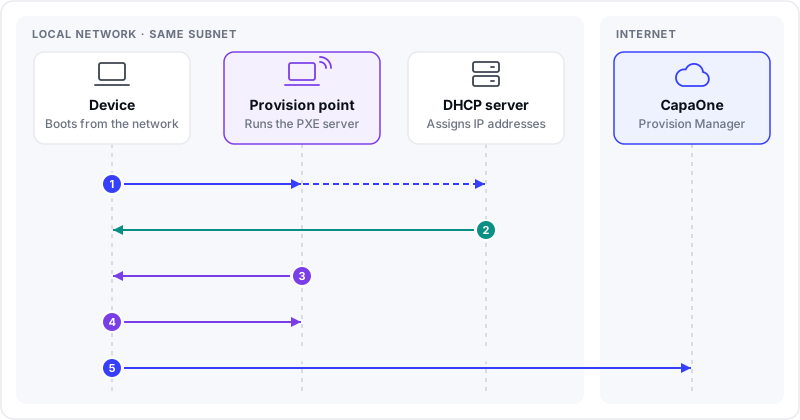
Routers don’t forward broadcasts. Where the device is, compared to the provision point, decides what your network needs:
| Device location | What your network needs |
|---|---|
| Same subnet as the provision point | Nothing extra. The device and the provision point reach each other by broadcast. |
| Different subnet from the provision point | IP helper (DHCP relay) on the router (recommended), or DHCP options 66 and 67. See Set up PXE boot across subnets. |
Check the network requirements
Section titled “Check the network requirements”Before you troubleshoot a specific symptom, confirm that the device and your network meet these requirements:
- Wired connection. The device is connected with a network cable. PXE boot doesn’t work over Wi-Fi.
- UEFI network boot. The device boots in UEFI mode, not Legacy/CSM. Network boot and the UEFI IPv4 network stack are enabled in the firmware settings. In the boot menu, select the IPv4 network boot entry.
- Active PXE server. In Windows → Provision → Provision Points, the PXE Server column shows Active for the provision point. The server stops after 30 minutes unless you start it with Always On.
- A path to the provision point. The device is on the same subnet as the provision point, or your network relays PXE traffic to it. Compare the device’s subnet with the Subnets column in the Provision Points list.
- One PXE server per subnet. No other PXE server answers on the device’s subnet, such as a CapaInstaller, WDS, or Configuration Manager PXE server.
- DHCP option 60 matches your setup. Set option 60 (
PXEClient) only if the provision point runs on the DHCP server itself. See Run the provision point on the DHCP server. In any other setup, option 60 isn’t set on the DHCP scope or server. See DHCP option 60 sends the device to the DHCP server.
Set up PXE boot across subnets
Section titled “Set up PXE boot across subnets”When the device is on a different subnet than the provision point, the router between them drops the device’s broadcast. Configure IP helper (DHCP relay) on the router, so it forwards the request to the provision point.
We recommend IP helper instead of DHCP options 66 and 67:
- With IP helper, the provision point receives each request itself. It answers x64 and ARM64 devices with the right boot file.
- Option 67 is one fixed boot file per scope. A scope with DHCP options serves either x64 or ARM64 devices, not both.
Use DHCP options 66 and 67 only if you can’t change the router configuration.
Configure IP helper (DHCP relay)
Section titled “Configure IP helper (DHCP relay)”On the router or layer 3 switch that routes the device’s subnet, configure IP helper on the interface for that subnet. Add one helper address for each of these servers:
- The DHCP server
- The provision point
The router forwards the device’s DHCP broadcasts to both servers. The DHCP server answers with an IP address, and the provision point answers with the boot information. If the subnet already has an IP helper for the DHCP server, keep it and add the provision point as a second helper address.
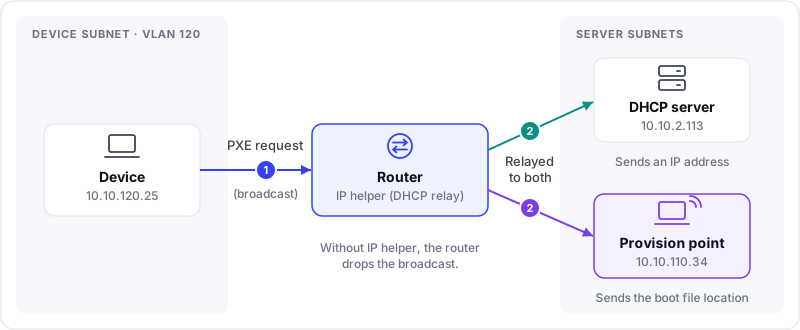
The commands depend on your network equipment. For example, on a Cisco IOS router where the device’s subnet is VLAN 120:
interface Vlan120 ip helper-address 10.10.2.113 ip helper-address 10.10.110.34In this example, 10.10.2.113 is the DHCP server and 10.10.110.34 is the provision point.
Configure DHCP options 66 and 67 on Windows Server
Section titled “Configure DHCP options 66 and 67 on Windows Server”Use this method only if you can’t configure IP helper on the router. Set these options on the DHCP scope that the device boots on:
| Option | Value |
|---|---|
| 066 Boot Server Host Name | The IP address or FQDN of the provision point |
| 067 Bootfile Name (x64 devices) | boot\amd64\bootx64.efi |
| 067 Bootfile Name (ARM64 devices) | boot\arm64\bootaa64.efi |
Option 67 holds one boot file per scope, so the scope serves either x64 or ARM64 devices. If both architectures boot on the same scope, use IP helper instead.
- Open the DHCP console.
- Expand the server, then IPv4 → the scope that the device boots on.
- Right-click Scope Options and click Configure Options.
- Select 066 Boot Server Host Name. In String value, enter the IP address or FQDN of the provision point.
- Select 067 Bootfile Name. In String value, enter the boot file for the device architecture from the table.
- Click OK.
- Restart the device and PXE-boot it again.
The device gets its boot file from the provision point and loads the CapaOne provisioning environment.
If the device doesn’t boot with an FQDN in option 66, enter the provision point’s IP address instead.
Run the provision point on the DHCP server
Section titled “Run the provision point on the DHCP server”If the provision point is the DHCP server itself, set DHCP option 60 to PXEClient. The DHCP
service and the PXE server can’t both answer on UDP port 67. Option 60 tells the device that the
DHCP server also runs the PXE server, so the device sends its boot request there.
Add option 60 next to the options that the scope already has. If the scope uses options 66 and 67, keep them.
To set option 60 on a Windows Server DHCP server:
- Open the DHCP console.
- Expand the server, right-click IPv4, and click Set Predefined Options.
- If 060 PXEClient isn’t in the Option name list, click Add.
- Enter the name
PXEClient, select the data type String, enter the code60, and click OK. - Click OK to close Predefined Options and Values.
- Expand IPv4 → the scope that the device boots on, right-click Scope Options, and click Configure Options.
- Select 060 PXEClient. In String value, enter
PXEClient. - Click OK.
- Restart the device and PXE-boot it again.
You can also set option 60 with PowerShell on the DHCP server. Replace 10.10.110.0 with the ID of
the scope that the device boots on:
Add-DhcpServerv4OptionDefinition -Name "PXEClient" -OptionId 60 -Type StringSet-DhcpServerv4OptionValue -ScopeId 10.10.110.0 -OptionId 60 -Value "PXEClient"Skip the first command if option 60 is already defined on the server.
The device sends its boot request to the DHCP server and loads the CapaOne provisioning environment.
If devices on other subnets boot from this provision point, their IP helper needs only the DHCP server’s address, because the DHCP server is also the provision point.
The device stops at Start PXE over IPv4
Section titled “The device stops at Start PXE over IPv4”The device stays on >>Start PXE over IPv4. and never loads the CapaOne provisioning environment.

First, work through Check the network requirements. If the device is on another subnet than the provision point, check the IP helper or DHCP option configuration in Set up PXE boot across subnets. If the requirements are met, the cause is usually one of the following.
DHCP option 60 sends the device to the DHCP server
Section titled “DHCP option 60 sends the device to the DHCP server”The most common cause is DHCP option 60 (PXEClient) set on the DHCP scope that the device boots
on. Option 60 tells the device that the DHCP server is also the PXE server. The device sends its
boot request to the DHCP server instead of the provision point, and the DHCP server rejects it.
This applies when the provision point and the DHCP server are different servers. If the provision point runs on the DHCP server, option 60 is required. Keep it as described in Run the provision point on the DHCP server.
To confirm the cause, capture the network traffic while the device PXE-boots, for example in
Wireshark with the dhcp display filter. With option 60 set, the capture shows this pattern:
- The device completes the normal DHCP exchange: Discover, Offer, Request, and ACK.
- The device sends proxyDHCP Request packets to the DHCP server, not to the provision point.
- The DHCP server answers each request with Destination unreachable (Port unreachable), because it doesn’t run a PXE service.
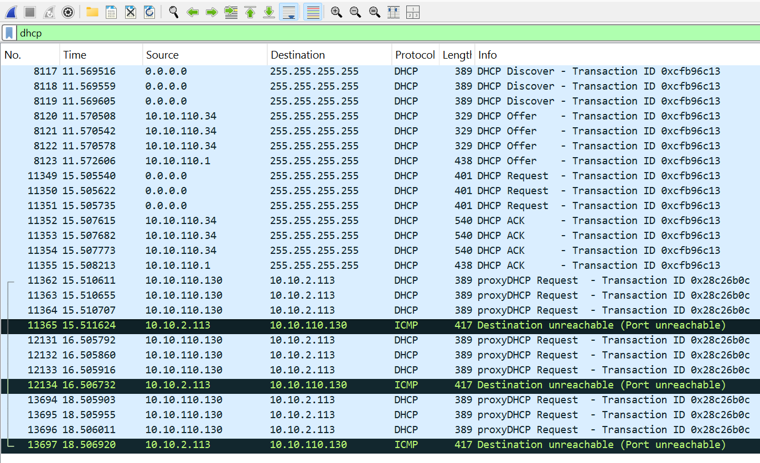
The addresses in this capture are:
| Address | Role |
|---|---|
10.10.110.1 |
Gateway |
10.10.2.113 |
DHCP server |
10.10.110.34 |
CapaOne provision point (PXE server) |
10.10.110.130 |
Device being PXE-booted |
To remove option 60 on a Windows Server DHCP server, delete only option 60. If the scope uses options 66 and 67, keep them.
- Open the DHCP console.
- Expand the server, then IPv4 → the scope that the device boots on → Scope Options.
- Right-click 060 PXEClient and click Delete.
- If Server Options also lists 060 PXEClient, delete it there too.
- Restart the device and PXE-boot it again.
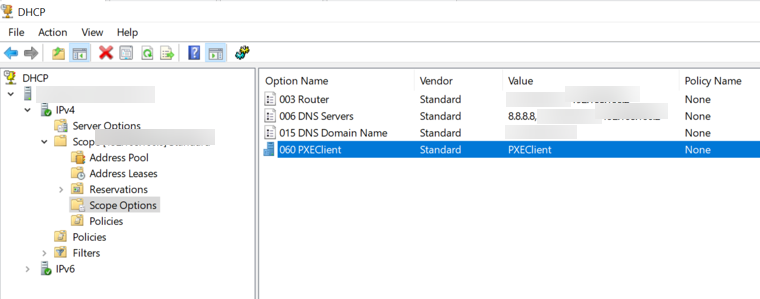
The device gets its boot answer from the provision point and loads the CapaOne provisioning environment.
Switch or firewall settings block PXE traffic
Section titled “Switch or firewall settings block PXE traffic”| Cause | Fix |
|---|---|
| Spanning Tree Protocol keeps the switch port blocked for up to 50 seconds after the link comes up. The PXE request times out before the port forwards traffic. | Enable PortFast (edge port) on the switch ports where devices PXE-boot. |
| 802.1X port authentication blocks the device, because it can’t authenticate before Windows is installed. | Allow the device with MAC Authentication Bypass (MAB), or provision it on a port or VLAN without 802.1X. |
| A firewall or security software on the provision point blocks the PXE traffic. | Allow inbound UDP ports 67 and 4011 (PXE requests) and UDP port 69 (TFTP boot file download) on the provision point. The CapaOne Agent opens these ports in Windows Firewall when the PXE server starts, so check third-party firewall and security software. |
| A firewall between the subnets blocks the relayed traffic. | Allow UDP ports 67, 69, and 4011 between the device’s subnet and the provision point. |
PXE boot fails through a docking station or USB network adapter
Section titled “PXE boot fails through a docking station or USB network adapter”Many laptops don’t have a built-in network port, so they PXE-boot through a docking station or a USB network adapter. The dock and the device firmware must both support network boot. Work through these checks in order:
- Test with a direct connection. Connect the cable to the device’s built-in network port, if it has one, or use a different adapter. If PXE boot works this way, the dock or adapter is the cause.
- The dock supports PXE boot. Not every dock or USB network adapter supports network boot. Check the manufacturer’s specifications. Docks from the device’s own manufacturer usually support PXE boot on their models.
- The firmware allows boot through the dock. In the device’s BIOS/UEFI settings, enable USB or Thunderbolt boot support and the pre-boot modules for the dock. Setting names differ between manufacturers.
- The dock is connected before the device starts. Connect the dock and the network cable, then power on the device. The firmware detects network adapters at startup, so a dock that you connect later can be missing from the boot menu.
- The firmware is up to date. Update both the device’s BIOS/UEFI and the dock firmware.
- The expected MAC address is used. Many laptops pass their own MAC address through the dock. If your network uses DHCP reservations, MAC filtering, or MAB, check whether it expects the laptop’s or the dock’s MAC address.
If PXE boot still fails through the dock, provision the device from a USB key. If the device PXE-boots through the dock but then stops on an error screen, see the next section.
The device boots but stops on an error screen
Section titled “The device boots but stops on an error screen”The device loads the provisioning environment, then shows an error screen.
The most common cause is a missing network driver. The provisioning environment needs its own driver for the device’s network adapter. Without it, the provisioning environment can’t connect to the network after it starts. CapaSystems maintains the drivers in the provisioning environment, so you can’t add drivers to it yourself.
This often happens when the device boots through a docking station or a USB network adapter. The device firmware can PXE-boot through the adapter, but the provisioning environment has no driver for it.
- Try the device’s built-in network port, or a different dock or adapter.
- If the error remains, contact CapaOne support. Include the device manufacturer and model, and the model of the dock or network adapter.
Installation starts but fails during deployment
Section titled “Installation starts but fails during deployment”Provisioning starts, but Windows installation fails before the device is enrolled.
Open Windows → Provision → History, open the device’s menu, and select View Logs. The log shows which step of the deployment failed. Select Download Logs to save the log, for example to send it to CapaOne support.
Related
Section titled “Related”- Provision Points
- USB Key Deployment
- Getting Started with Provision Manager
- Provisioning vs Enrollment
- Preboot Execution Environment on Wikipedia — background on how PXE boot works.